— Designs, Tips")


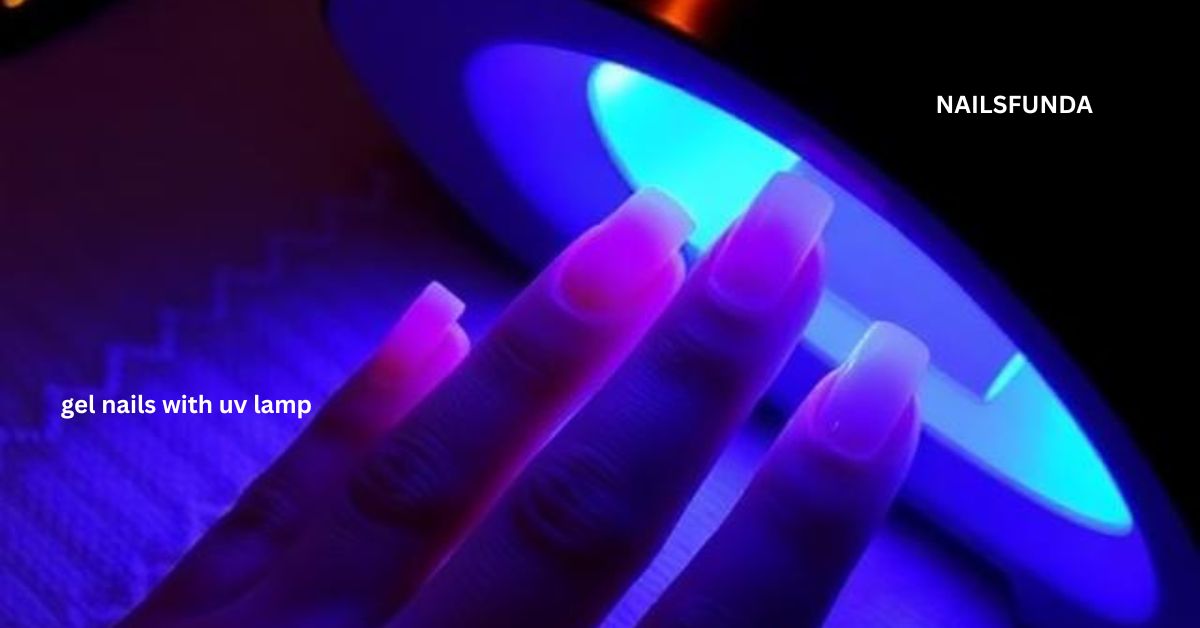
Beautiful, glossy, chip-resistant nails are no longer just a salon luxury. With the right tools and techniques, you can achieve professional-quality Gel Nails with UV Lamp right at home.
This complete step-by-step guide walks you through everything — from preparation to removal — while breaking the process into 525+ detailed, beginner-friendly steps so you never feel confused.
Whether you’re new to gel manicures or want to perfect your technique, this guide will help you master Gel Nails with UV Lamp safely and confidently.
Understanding Gel Nails
Before jumping into the step-by-step process, it’s important to understand what makes Gel Nails with UV Lamp different from regular nail polish.
Gel polish:
- Is thicker than regular polish
- Requires curing under UV or LED light
- Lasts 2–3 weeks
- Has a glossy, salon-quality finish
- Resists chipping and peeling
The UV lamp activates photoinitiators in gel polish, hardening it instantly. Without curing, gel polish stays wet.
Why Choose Gel Nails with UV Lamp?
Here’s why many people prefer Gel Nails with UV Lamp over traditional manicures:
- Longer-lasting shine
- Faster drying time
- Stronger finish
- Less smudging
- Ideal for busy lifestyles
Now let’s move to the full step-by-step process.
Nail Preparation
Preparation is 50% of your success. Never skip this stage.
Cleaning & Shaping
- Wash your hands thoroughly.
- Dry completely.
- Remove old polish.
- Use an acetone-based remover for stubborn polish.
- Trim nails to the desired length.
- File nails in one direction.
- Avoid sawing back and forth.
- Shape into a square, oval, almond, or coffin.
- Smooth rough edges.
- Clean under nails.
- Push back cuticles gently.
- Use a wooden stick or cuticle pusher.
- Trim excess cuticle carefully.
- Avoid cutting living skin.
- Brush away nail dust.
- Lightly buff nail surface.
- Remove shine from natural nail.
- Do not over-buff.
- Clean with a lint-free wipe.
- Use nail cleanser or alcohol.
- Remove oil residue.
- Ensure nails are completely dry.
- Avoid touching the nail surface.
- Apply dehydrator (optional).
- Apply nail primer if needed.
Nail Surface Preparation
- Inspect nail surface.
- Remove any leftover shine.
- Ensure smooth texture.
- Check for cuticle overlap.
- Remove the invisible cuticle layer.
- Clean edges carefully.
- Avoid touching your skin after cleaning.
- Check sidewalls.
- Ensure no moisture remains.
- Make sure nails are oil-free.
- Use lint-free wipes only.
- Avoid cotton fibers.
- Keep nails dust-free.
- Double-check nail shape symmetry.
- Adjust if needed.
- Ensure no cracks.
- Lightly buff ridges.
- Clean again with alcohol.
- Let air dry.
- Prepare the UV lamp.
- Check bulb condition.
- Ensure the lamp is clean.
- Place the lamp on a flat surface.
- Plug in safely.
- Set timer option.
- Organize tools nearby.
- Keep gel polish ready.
- Shake the polish bottle gently.
- Do not over-shake.
- Open the bottle carefully.
- Wipe excess polish on the brush.
- Ensure the room is well ventilated.
- Keep your hands steady.
- Avoid fans during application.
- Begin base coat prep.
Hygiene & Safety
- Sanitize tools.
- Disinfect the cuticle pusher.
- Use a clean nail file.
- Avoid sharing tools.
- Keep acetone away from flames.
- Protect skin if sensitive.
- Apply cuticle oil around the skin (not the nail).
- Remove oil before polishing.
- Avoid gel contact with skin.
- Clean spills immediately.
- Wear protective gloves if needed.
- Avoid direct UV exposure to skin.
- Use sunscreen on hands (optional).
- Position fingers flat under the lamp.
- Do not overcrowd the lamp.
- Cure one hand at a time.
- Keep nails still while curing.
- Avoid touching wet gel.
- Cap free edge later.
- Use thin layers only.
- Avoid thick gel coats.
- Keep brush strokes smooth.
- Wipe the brush neck clean.
- Close the bottle tightly.
- Store gel upright.
- Keep away from sunlight.
- Avoid heat exposure.
- Clean workspace.
- Keep tissues nearby.
- Use lint-free wipes only.
- Maintain calm hands.
- Work patiently.
- Do not rush.
- Follow timing strictly.
- Use the recommended curing time.
- Avoid under-curing.
- Avoid over-curing.
- Keep children away.
- Check expiration date.
- Now you’re ready for the base coat.
Base Coat Application
The base coat is critical for long-lasting Gel Nails with UV Lamp.
- Apply a thin layer of base coat.
- Start from the center.
- Move toward the tip.
- Then paint the sides.
- Avoid the cuticle area.
- Leave a small gap near the skin.
- Cap free edge.
- Keep layers thin.
- Check for pooling.
- Fix mistakes immediately.
- Turn the hand upside down briefly to level.
- Place under UV lamp.
- Cure for 2 minutes (UV).
- Follow brand instructions.
- Keep fingers flat.
- Avoid moving your hand.
- Wait for the timer.
- Remove the hand carefully.
- Do not wipe the sticky layer.
- Check smoothness.
- Ensure fully cured.
- If soft, cure again.
- Avoid touching the nail surface.
- Proceed to the next hand.
- Repeat the same steps.
- Ensure even curing.
- Inspect edges.
- Make sure the base is sealed.
- Confirm shine is even.
- Avoid overloading the brush.
- Clean bottle rim.
- Close tightly.
- Store safely.
- Inspect lamp bulbs.
- Prepare color polish.
- Choose the desired shade.
- Test the color on the sample.
- Wipe the brush gently.
- Ensure thin layers.
- Begin color application.
- Stay calm.
- Keep strokes smooth.
- Avoid pressing hard.
- Maintain consistent thickness.
- Double-check coverage.
- Avoid touching skin.
- Clean mistakes with a brush dipped in alcohol.
- Cure properly.
- Repeat if needed.
- Move to the color stage.
Gel Color Application
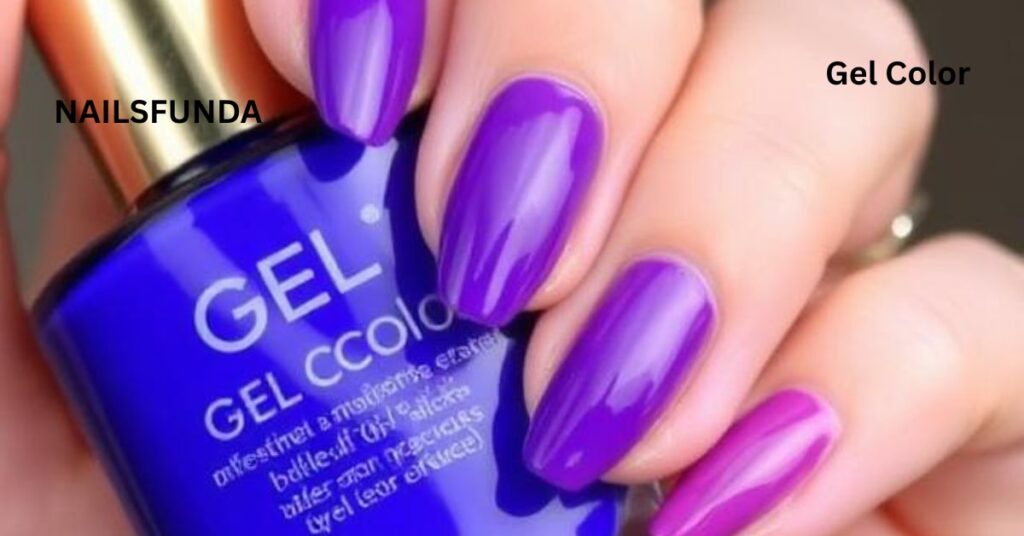
Color application is where your manicure truly comes alive. When applying Gel Nails with UV Lamp, thin layers and controlled curing are the keys to achieving a smooth, long-lasting finish.
First Color Layer
- Open your gel color bottle carefully.
- Wipe one side of the brush against the rim of the bottle.
- Keep a small bead of gel nails with UV lamp on the brush.
- Place the brush slightly above the cuticle.
- Push gently toward the cuticle without touching it.
- Pull straight down toward the tip.
- Use light pressure. gel nails with UV lamp
- Paint one side of the nail.
- Then paint the other side.
- Cap the free edge.
- Keep the layer extremely thin.
- Avoid flooding sidewalls.
- Check for streaks.
- Smooth out uneven lines.
- Use steady strokes. gel nails with UV lamp
- Keep your wrist relaxed.
- Rotate finger if needed.
- Ensure full coverage.
- Do not overload the brush.
- Clean gel from skin immediately.
- Use a detail brush if necessary.
- Keep polish within nail boundaries.
- Maintain consistent thickness.
- Check the cuticle gap.
- Ensure no air bubbles.
- Inspect the nail from different angles.
- Place your hand inside the UV lamp.
- Cure for 2 minutes (standard UV lamp).
- Follow the manufacturer’s timing.
- Keep fingers flat.
- Avoid touching lamp walls.
- Remove the hand carefully.
- Do not wipe the sticky layer.
- Check surface texture.
- Confirm it is semi-hardened.
- Repeat for the remaining fingers.
- Cure thumbs separately if needed.
- Keep movements minimal.
- Ensure consistent curing time.
- Avoid rushing. gel nails with UV lamp
- Inspect all nails.
- Look for thin spots.
- Prepare for the second coat.
- Close the bottle between uses.
- Keep gel away from sunlight.
- Avoid thick buildup near the tip.
- Maintain a clean brush.
- Wipe excess polish from the neck.
- Ensure even shine. gel nails with UV lamp
- Move to the second layer.
Second Color Layer
The second coat enhances depth and opacity in Gel Nails with UV Lamp.
- Reopen gel polish.
- Wipe the brush again.
- Apply slightly above the cuticle.
- Push gently upward.
- Pull toward the tip smoothly.
- Maintain a thin layer again.
- Avoid thick coating.
- Cap the free edge carefully.
- Double-check sidewalls.
- Ensure complete coverage.
- Fix uneven patches.
- Smooth visible streaks.
- Remove polish from skin immediately.
- Use a precision brush if needed.
- Check under bright light.
- Inspect for bubbles.
- Keep nail surface level.
- Turn your hand upside down briefly.
- Allow gel to self-level.
- Place under gel nails with UV lamp.
- Cure for the full recommended time.
- Do not interrupt the curing cycle.
- Keep fingers flat and separated.
- Avoid touching other nails.
- Remove the hand gently.
- Check gloss level.
- Ensure full opacity. gel nails with UV lamp
- Confirm even curing.
- If needed, apply a third thin coat.
- Never apply a thick single coat.
- Thin layers last longer.
- Cure again if adding a coat.
- Maintain patience. gel nails with UV lamp
- Avoid touching the sticky layer.
- Inspect edges carefully.
- Check free edge sealing.
- Ensure no lifting.
- Keep nail shape intact.
- Avoid pooling near cuticles.
- Clean any overflow. gel nails with UV lamp
- Compare both hands for symmetry.
- Adjust if needed.
- Ensure consistent shine across all nails.
- Remove dust if present.
- Prepare for the top coat.
- Keep gel bottles tightly closed.
- Store upright. gel nails with UV lamp
- Keep the workspace organized.
- Relax your hands briefly.
- Proceed to the finishing stage.
Advanced Application Techniques
These professional-level techniques help your Gel Nails with UV Lamp look salon-perfect.
- Use a thin detailing brush for edges.
- Perfect your cuticle line.
- Keep the color 1mm away from the skin.
- Use slow, controlled strokes.
- Avoid shaking hands. gel nails with UV lamp
- Rest your elbow on the table for stability.
- Keep the room temperature moderate.
- Avoid a cold environment (gel thickens).
- Avoid a hot environment (gel thins).
- Mix glitter gel gently.
- Do not create air bubbles.
- Apply glitter in thin layers.
- Cure fully between coats. gel nails with UV lamp
- For ombre, blend quickly before curing.
- Use sponge for a gradient effect.
- Cure immediately after blending.
- For French tips, use guidelines.
- Cure tip separately if needed.
- Clean the smile line carefully.
- Apply thin striping layers.
- Cure detailed art longer if required.
- Avoid stacking too many thick layers.
- Keep the total structure balanced.
- Inspect nail thickness profile.
- Ensure apex is centered (for long nails).
- Maintain natural curve.
- Avoid a bulky appearance.
- Use builder gel if needed.
- Cure the builder gel thoroughly.
- Do not mix brands randomly.
- Follow the same system if possible.
- Check lamp wattage.
- Replace old bulbs regularly.
- Clean lamp interior.
- Avoid curing beyond the recommended time.
- Watch for heat spikes.
- Remove hand briefly if burning occurs.
- Reinsert to complete the cure.
- Inspect every nail carefully.
- Ensure uniform color depth.
- Check for patchiness.
- Confirm edges are sealed.
- Ensure the surface is smooth.
- Prepare for the top coat.
- Do not wipe the sticky layer yet.
- Keep your hands steady.
- Confirm satisfaction with color.
- Make final corrections.
- Close the color bottle tightly.
- Move to the top coat application.
Why Proper Application Matters
When done correctly, Gel Nails with UV Lamp can last 2–3 weeks without chipping. Incorrect application — especially thick coats or poor curing — leads to lifting, peeling, and dullness.
Precision and patience are what separate amateur results from professional-quality shine.
Top Coat & Long-Lasting Shine
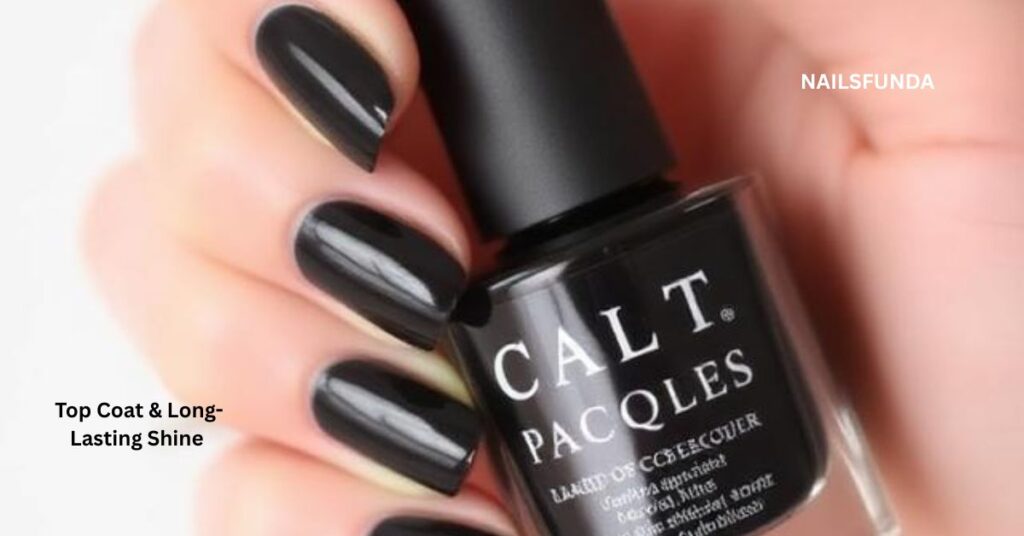
The top coat is what seals your entire manicure. When doing Gel Nails with UV Lamp, this layer locks in color, protects against chips, and delivers that glass-like shine.
Top Coat Application
- Open the top coat bottle carefully.
- Wipe one side of the brush.
- Pick up a moderate product.
- Place the brush above the cuticle.
- Push gently toward the cuticle.
- Pull straight down smoothly.
- Cover the entire nail evenly.
- Keep the layer slightly thicker than the color coat.
- Avoid flooding the skin.
- Cap free edge thoroughly.
- Check both sides of the nail.
- Ensure no gaps in coverage.
- Look at the nail from the side angle.
- Confirm smooth surface.
- Avoid overworking gel.
- Do not press the brush too hard.
- Maintain even thickness.
- Clean any gel from the skin.
- Keep your hands steady.
- Insert your hand into the UV lamp.
- Cure for the full recommended time.
- Usually 2–3 minutes (UV lamp).
- Do not shorten curing time.
- Keep fingers flat.
- Cure thumbs separately if needed.
- Wait for the timer to finish.
- Remove the hand carefully.
- Inspect the shine level.
- Check for dull patches.
- If dull, cure 30 seconds more.
- Allow nails to cool briefly.
- Do not touch immediately.
- Wipe sticky layer with cleanser.
- Use a lint-free wipe only.
- Clean one nail at a time.
- Observe final gloss.
- Check edges for sealing.
- Ensure the free edge is coated.
- Confirm smooth finish.
- Repeat for the second hand.
- Maintain equal curing time.
- Inspect symmetry between hands.
- Avoid bumping nails.
- Let nails settle for 5 minutes.
- Apply cuticle oil.
- Massage gently.
- Wipe excess oil lightly.
- Admire the final shine.
- Take photos if desired.
- Enjoy your flawless finish.
Shine & Durability Boosters
- Always cap the free edge.
- Avoid a thick top coat.
- Use high-quality gel brands.
- Replace the old top coat.
- Keep lamp bulbs strong.
- Clean the lamp regularly.
- Avoid mixing incompatible brands.
- Cure for full-time.
- Avoid under-curing.
- Avoid over-curing repeatedly.
- Store gel upright.
- Keep away from sunlight.
- Avoid water exposure first hour.
- Do not scratch the surface.
- Avoid picking edges.
- Wear gloves for cleaning.
- Apply cuticle oil daily.
- Avoid harsh chemicals.
- Do not peel gel.
- Reapply top coat after 1 week (optional).
- Keep nails moisturized.
- Avoid excessive heat.
- Avoid biting nails.
- Protect during heavy tasks.
- Use gentle soap.
- Avoid contact with acetone.
- Keep nails dry when possible.
- File small snags immediately.
- Do not ignore lifting.
- Fix chips quickly.
- Use thin coats always.
- Cure fully every layer.
- Inspect nails under light.
- Avoid touching the sticky layer early.
- Maintain patience.
- Use a correct wattage lamp.
- Follow brand instructions.
- Avoid expired products.
- Practice proper technique.
- Keep nail structure balanced.
- Maintain cuticle care.
- Use quality primer.
- Keep the surface oil-free.
- Do not rush curing.
- Clean brushes properly.
- Close bottles tightly.
- Keep workspace dust-free.
- Maintain consistency.
- Practice regularly.
- Perfect your technique over time.
Aftercare & Maintenance
Proper aftercare ensures your Gel Nails with UV Lamp last the full 2–3 weeks.
- Apply cuticle oil daily.
- Massage into nail beds.
- Use hand cream regularly.
- Avoid using nails as tools.
- Do not pick at edges.
- Wear gloves while washing dishes.
- Avoid harsh detergents.
- Keep nails dry.
- Avoid prolonged soaking.
- Pat’s hands are dry immediately.
- Avoid nail biting.
- Do not peel gel.
- Trim hangnails gently.
- File rough edges lightly.
- Avoid metal scraping.
- Maintain nail hygiene.
- Avoid excessive sun exposure.
- Rehydrate cuticles nightly.
- Avoid contact with acetone.
- Keep nails clean.
- Do not pry objects.
- Avoid lifting corners.
- Use a strengthening base next time.
- Reapply top coat if the shine dulls.
- Schedule removal after 2–3 weeks.
- Never force removal.
- Monitor nail health.
- Give nails a break occasionally.
- Use nourishing oils.
- Keep your hands moisturized in winter.
- Avoid trauma to nails.
- Protect during gym workouts.
- Avoid picking polished edges.
- Trim nails if too long.
- Watch for allergic reactions.
- Stop use if irritation occurs.
- Maintain tool hygiene.
- Replace old files.
- Clean the UV lamp surface.
- Inspect bulbs regularly.
- Avoid over-filing the natural nail.
- Keep nails balanced.
- Avoid heavy pressure.
- Maintain proper nail shape.
- Do not over-buff between sets.
- Nourish nails between manicures.
- Hydrate daily.
- Use nail strengthener occasionally.
- Take biotin if recommended.
- Maintain a healthy diet.
- Drink enough water.
- Protect nails during gardening.
- Avoid constant tapping on hard surfaces.
- Keep nails moderately short.
- Avoid peeling layers.
- Be gentle during daily activities.
- Do not use teeth to remove gel.
- Follow safe removal only.
- Maintain consistency in care.
- Treat nails as delicate.
- Schedule proper removal timing.
- Never rip gel off.
- Preserve natural nail health.
- Allow breathing time between sets.
- Keep cuticles moisturized.
- Avoid aggressive filing.
- Protect nails from trauma.
- Monitor lifting areas.
- Seek professional help if unsure.
- Prepare for safe removal.
Safe Removal Process
Proper removal is critical when working with Gel Nails with UV Lamp.
- File the top coat gently.
- Remove shine completely.
- Do not file the natural nail deeply.
- Soak cotton in acetone.
- Place on nail.
- Wrap with foil.
- Secure tightly.
- Wait 10–15 minutes.
- Check one nail.
- Gently push softened gel.
- Use a wooden stick.
- Do not scrape aggressively.
- Rewrap if needed.
- Remove the remaining gel slowly.
- Buff the surface lightly.
- Remove residue.
- Wash your hands.
- Apply nourishing oil.
- Massage gently.
- Apply strengthening treatment.
- Allow nails to rest.
- Avoid immediate reapplication.
- Keep nails hydrated.
- Trim if needed.
- File gently.
- Avoid peeling leftovers.
- Use a gentle buffer only.
- Moisturize daily.
- Apply nail serum.
- Let nails breathe.
- Avoid chemicals.
- Maintain hydration.
- Keep nails short during break.
- Avoid biting.
- Continue using cuticle oil.
- Eat a balanced diet.
- Drink water daily.
- Monitor nail recovery.
- Avoid harsh filing.
- Maintain patience.
- Wait before the next gel set.
- Choose quality products next time.
- Improve technique in each set.
- Replace old tools.
- Clean UV lamp.
- Check bulb power.
- Practice thin coats next time.
- Avoid thick application.
- Follow the full curing time.
- Keep nail surface oil-free.
- Maintain hygiene.
- Protect the nail plate.
- Respect the removal process.
- Prioritize nail health.
- Master the complete system.
- Enjoy safe, long-lasting manicures.
FAQs About Gel Nails with UV Lamp
1. How long do Gel Nails with UV Lamp last?
Typically, 2–3 weeks without chipping if applied correctly.
2. Is the UV lamp safe?
Yes, when used properly. Exposure time is short. Some people apply sunscreen on their hands as extra protection.
3. Why does my gel peel early?
Usually due to poor nail prep or thick layers.
4. Can I use LED instead of UV?
Yes, but curing times differ depending on the polish formula.
5. Why is my gel sticky after curing?
That is the inhibition layer. Wipe with alcohol cleanser.
6. Can I skip the base coat?
No. Base coat ensures adhesion and protects natural nails.
7. How often should I replace UV bulbs?
Every 6 months, depending on usage.
8. Can I remove gel without acetone?
Proper removal requires acetone soak-off.
9. Why does my gel wrinkle?
Usually due to thick layers or under-curing.
10. Can beginners do Gel Nails with UV Lamp at home?
Absolutely. With patience and thin layers, beginners can achieve salon-quality results.
Final Thoughts
Mastering Gel Nails with UV Lamp is all about preparation, thin layers, proper curing, and safe removal. When done correctly, the results are glossy, durable, and professional-looking.
This complete 525+ step guide gives you everything needed to confidently perform Gel Nails with UV Lamp at home — from prep to removal — while protecting your natural nail health.
Consistency, patience, and high-quality products will ensure your Gel Nails with UV Lamp remain beautiful, chip-resistant, and salon-worthy every time.
With practice, your technique will improve, and your shine will last longer with every set.